Disclaimer: As an Amazon Associate, I earn from qualifying purchases.
For individuals living with diabetes, choosing the right footwear is a critical part of foot health management. Today, I will show you how to measure your feet at home for the perfect diabetic shoe fit to ensure your comfort and safety.
Over my 20-year journey with diabetes, I’ve learned that even the best shoe won’t help if the fit is wrong. Here is my personal step-by-step guide to making sure you get the perfect measurement every time.”
Before you click “Buy” on that next pair of orthopedic shoes, follow this comprehensive guide to measure your feet accurately at home.
1. Why Accuracy is Vital for Diabetics
Diabetes can cause feet to swell (edema) or lead to a loss of sensation (neuropathy). This means you might not feel if a shoe is pinching or rubbing against your skin.
A precise measurement ensures that the shoe provides enough room to prevent friction while offering the necessary support to keep your feet healthy.
2. Tools You Will Need
Gather these simple items before you start:
- Two large pieces of white paper (larger than your feet).
- A sharpened pencil or a pen.
- A measuring tape or a ruler (inches and centimeters).
- The socks you plan to wear with your new shoes.
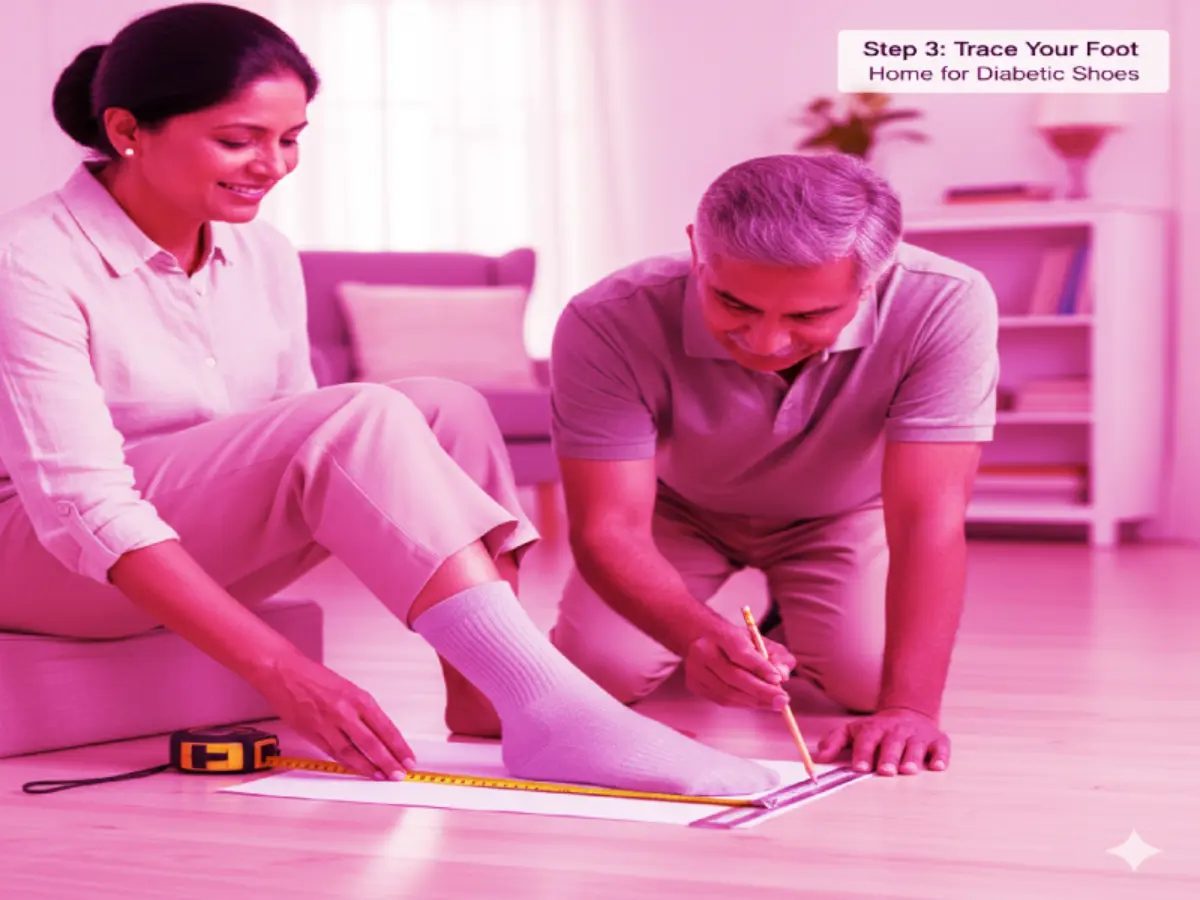
3. Step-by-Step Measurement Process
Step 1: Timing is Everything
Human feet tend to swell throughout the day, reaching their maximum size in the late afternoon or evening. Always measure your feet during this time to ensure your shoes remain comfortable all day long.
Step 2: Position Your Foot
Place a piece of paper on a flat, hard surface (avoid carpets). Stand on the paper with your weight distributed evenly on both feet. For the best accuracy, it is helpful to have someone else do the tracing while you stand straight.
Step 3: Trace the Outline
Hold the pencil perfectly upright (at a 90-degree angle) to the paper. Trace the entire outline of your foot. Ensure the pencil stays snug against your foot without tilting inward or outward.
Common Mistakes to Avoid While Measuring
Many people fail to get an accurate size because of small errors during the process:
- Never measure while sitting down: When you sit, your arches don’t flatten. Always stand to get the “active” size of your foot.
- Avoid soft tailor’s tape in the air: Measuring the foot directly in the air often leads to underestimation. Tracing on paper is the gold standard.
- Don’t assume your size is the same: Age, weight changes, and health conditions like diabetes can change your foot shape significantly over time.
Step 4: Mark Length and Width
Once traced, step off the paper and mark the following:
- Length: Draw a straight line from the very tip of your longest toe to the back of your heel.
- Width: Draw a line across the widest part of your forefoot (the “ball” of the foot).
Record and Compare
How to Ensure the Best Fit Every Time
Measure the lines using your tape measure. Write down the numbers in both inches and centimeters. If one foot is slightly larger than the other (which is very common), always use the measurement of the larger foot when choosing your shoe size.
4. The Importance of “Width” and Volume

Length is only half the story. Most diabetic patients require Wide (2E) or Extra Wide (4E) fittings to accommodate swelling. Look for shoes specifically designed with a “Wide Toe Box.”
Understanding Volume and Arch Height
If you have high arches, a shoe might be long and wide enough but still feel too tight on the top (instep). Look for shoes with “High Volume” or “Extra Depth” designs. If you use a prescribed insole, ensure the shoe has a removable footbed to prevent your toes from rubbing against the “ceiling” of the shoe.
5. Final Tips to Measure Your Feet at Home Effectively
When browsing online, always refer to the specific Brand’s Size Chart. Sizes can vary significantly between brands. If your measurement falls between two sizes, it is generally safer to choose the larger size.
The “Walk Test” After Your Purchase
Once your shoes arrive, perform a “Walk Test” on a clean carpeted surface for 15-20 minutes. Take them off and inspect your feet for:
- Red spots
- Pressure marks
- Any signs of irritation
Pro Tip: There should be about a half-inch of space (the width of your thumb) between your longest toe and the front of the shoe. Your toes should be able to wiggle freely!